— From one and the same transparency came the exhibition print and the photo book. To me, they did not look the same.
From One Transparency Came an Exhibition Print and a Photo Book
Up to the previous article, I wrote about how the image the lens made ended up on the film. This article is about what came after that. The original transparency that came back from the lab — where did it go?
In 1994, the mountain-photography group I belonged to published a photo book: Nihon Arupusu no Shiki (Tokyo Shimbun Shuppankyoku). One of my photographs was in it. A 6×9 transparency shot on Velvia. Connected with the same book, there was also an exhibition of original prints. What I handed to the publisher was a single original — one transparency. I think I put it in a sleeve. The practical work was handled by the group's exhibition committee, so what happened from there — how the book was made, who printed the exhibition prints and how — I do not know. The original came back. So did the print that had been exhibited.
Which means I ended up with three things made from one and the same original, side by side in my hands. The original transparency itself. The exhibition print. The page of the photo book. Did they look the same? They did not. My honest reaction at the time was: “Huh. So a photo book really is lower quality.”
This is not a claim that photo books of the time were low quality in general. It is my judgement, made by looking with my own eyes at several outputs made from my own original. What changed, and where, I cannot say. I never touched the process.
But the experience left me with a question. Even if the original is at its best, it does not follow that the print or the printed page will look the same. So where, then, was that photograph finished? In the original? In the print? On the page? This article walks through that question in the order of the roles the original played.
Let Me Give the Answer Here
The photograph was not finished in any one place.
Here is what the sources can say. In the 1990s, an original transparency was a thing to be viewed directly on a light table, and at the same time an intermediate to be handed to prepress. The lab, the scan, the color separation, the halftone, the paper — each was a controlled process, and what remains differs from path to path. On no path is the full performance of the original used as it is, and on no path does it become meaningless either. How much was taken away, and where, the sources do not say. This article does not say it either.
Here is what I can say. The original was a thing to be judged, a thing to show people, and the source of the prints and the photo book. Even so, the finished photograph, for me, was not the original. Printed, framed, hung on the wall — finished. That is still true today. That does not mean the original was not needed. Without the original, nothing would have started.
On the Light Table, the Original Was the Work
Whether a transparency passed or failed, I decided on the light table — I wrote that in the previous article. I weeded them out there, and only then handed them on to be printed or to a publisher. The assessment made on the original I never changed at any later output. How I looked at an original through a loupe is as I described in the article on the circle of confusion.
The original was not something only I looked at. The mountain-photography group I belonged to, Shiki, had a monthly competition. Every month a judge came, it was run as a contest, and entries were ranked down to tenth place. The judging was done with the original transparencies laid on a light table. Titles were given, but names were withheld. So that the judging would not be swayed by who had made the picture — that is my understanding. I do not know the official reason for the rule. In any case, as a result, several entries from one photographer could place. In my early days in the group, I was not chosen very often.
It was the same when showing people. Either I showed a print, or I brought a light table and a loupe and showed the original itself. A slide projector I used a little in the early days, when I was still shooting 35mm, but it was a nuisance and I soon gave it up. For me, the original was also a thing to show.
On the sources' side, viewing a transparency directly was a properly defined path. A 1996 Fujifilm document on duplicating film says that how a transparency looks depends on the quality and brightness of the viewing light, and goes as far as specifying a 5000 K light source, its brightness and its uniformity. A 1975 ISO standard defines viewing conditions for looking at transparencies directly and for comparing them with printed matter. An original on a light table was treated, in the sources too, as something to be looked at in its own right. What the sources do not say is how many photographers of the time showed or handed over the original itself.
The Lab as a Process
Before an original reached the light table, there was the lab.
From the sources. E-6, the standard process for transparency film, is written up as a controlled image-forming process. Kodak's literature for pro labs specifies the first-developer time to the second and its temperature to a tenth of a degree, and tells the lab to read control strips on a densitometer and to stop processing customers' film if the readings go outside the set limits. Processing was not simply a stage that degraded the image; it was a controlled stage. What the sources do not say is how closely Japanese labs actually ran to that, or how much variation there was from run to run.
From my side. I had my transparencies processed mainly at Horiuchi Color, in Shimbashi at the time. Normal processing, as a rule. I did occasionally ask for a push or a pull, but very rarely — hardly ever. The transparencies that came back I looked at on a light table in the company dormitory I was living in.
And I do not recall ever feeling that the color or density differed from one run to the next, or from one shop to another. To be exact: I could not tell them apart. That is not proof that there was no difference. Nor is it a story of my adjusting exposure or color in anticipation of lab variation. I did not notice a difference. That is all.
Handing Over the Original; the Print and the Book Come Back
Back to the photo book.
What I handed to the publisher was a single original, and nothing else. I never made a duplicate — not myself, and not by asking a lab. I had no reluctance about handing an original over to a publisher or anyone else. At the time, I believed that handing over the original was simply the normal way. That is what I believed; how common it was across the industry I do not know. On the sources' side, too, there is a Fujifilm document that lists handing an original over for color separation among its uses, and a 1995 case in which a prepress house received a 4×5 original and scanned it. How common that was, I do not know.
The photo book that came back did not, to me, look the same as the original. The exhibition print, too, looked like a different thing from the original. In the article on “gradation” I gave my own ranking — the original transparency, the direct print, the photo book — and one of the experiences behind it was this book.
Let me say it once more. The prepress and printing of the photo book, and the prints for the exhibition — I had no hand in any of it. So I cannot say from my experience what was lost — resolution, gradation, color, the halftone. What I can say is only that things made from the same original did not look the same to me.
What came later, when I began having exhibition prints made at a pro lab myself — how I placed the order and how I looked at the finished prints — I wrote about in a separate article. I will not repeat it here.
What Can Change on the Way to the Printed Page
Let me look, from the sources' side, at the part I could not see. Between the original and the printed page there are several stages.
First, the scan. Among the high-end prepress scanners of the 1990s there were drum scanners, which read an original mounted on a drum with photomultiplier tubes. In the literature there are models said to read at 10,000 to 18,000 samples per inch. But that figure is the fineness of the sampling grid, not the amount of detail actually captured. The scanning aperture — the opening that admits the light — its size, the enlargement ratio, and the sharpening — unsharp masking, a process that strengthens edges — each acts as a separate quantity. A 1998 patent from a prepress-equipment maker treats the original, the scanner's lens, the aperture, the enlargement, the monitor and the output as separate elements, and describes sharpening as something that can be built into the scanner itself.
Next, the color separation. The scanned image is separated into cyan, magenta, yellow and black plates. A person corrects the color and the density.
Next, the halftone. Printing makes its tones out of the size of dots. Adobe's 1995 printing guide gives as examples 85 lines per inch (lpi) for newspapers and 133 lpi for magazines on coated paper. Examples, not the standard of the time. The same guide also carries a case in which a 4×5 original was scanned and printed at 200 lpi.
And then the paper, the ink and the registration of the plates, and finally the page size, the lighting and the viewing distance. The fineness of the halftone, the spread of the ink, the absorbency of the paper, the misregistration of the plates — each changes a different component of resolution, gradation and color. No single stage decides everything, nor does the weakest stage alone decide the final look, because correction and sharpening remake the image along the way.
Which scanner my photo book was scanned on, at how many lines per inch it was printed, on what paper — I do not know. So this article does not say “what was lost in the photo book.” What it can say is only that there are this many stages at which things can change.
One more thing, in passing. When making a page or a print of the same size, the larger the original, the smaller the enlargement ratio. One of the advantages of large format lies here. But that is not to say “large format is always better.” I wrote about that in the article “How Many Megapixels Is 4×5 Film?”.
Neither Duplication nor Projection, in My Case
In the sources there are two more outputs for an original: making a copy of it on duplicating film, and projecting it with a slide projector. Both Fujifilm and Kodak made duplicating film, and claimed that color and gradation could be held over several generations of copies. That is a claim in the literature, not proof of a lossless copy. On the projection side, too, there are documents that spell out the conditions of projection lenses and screens.
Neither was on my path. I never made a duplicate. Projection, as I said above, I tried a little in the early 35mm days and gave up. If I was going to show someone, it was the original itself, or a print.
Where Was the Photograph Finished?
Let me line up what I have written so far by role.
The original was a thing to be judged. On a light table, names withheld, it was ranked. The original was a thing to show. I brought a light table and a loupe and showed it as it was. The original was the source. Hand over one, and an exhibition print and a photo book came into being, and the original came back. And the finished photograph, for me, was the framed print.
Printed, framed, hung on the wall — finished. That is still true today.
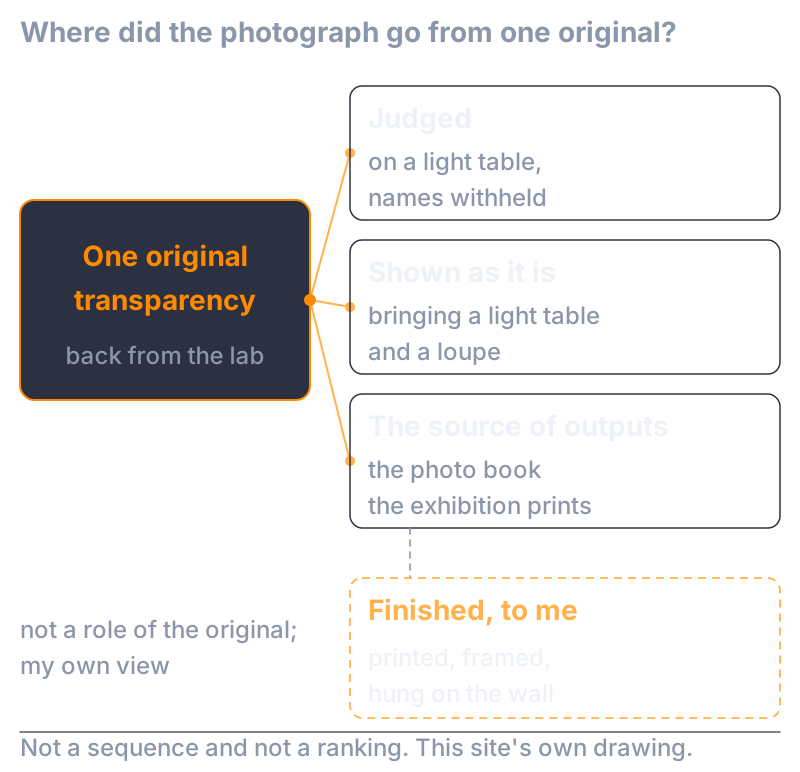
Fig. 1: Where did the photograph go from one original transparency? The original was judged, shown as it was, and became the source of the photo book and the exhibition prints. The dashed box is what was finished, to me — printed, framed, hung on the wall — my own view, not a role of the original. Not a sequence and not a ranking. This site's own drawing.
The sources do not say that. What the sources can say is only that an original can be a thing viewed directly and an intermediate for prepress, and that what remains differs from path to path. The question of where a photograph is finished is not in the sources. So the second half of this answer is my own view. It is not a statement about photographers in general.
Nor does it mean the original was not needed. The judging, the showing, the prints and the photo book — none of it would have started without the original. My original transparencies are, even now, basically sorted and kept — at the back of a closet, not easy to get at.
In Time, the Original Was Scanned
Later, the original gained one more output.
When the internet began to spread and I thought of making my own website, I needed to turn my transparencies into digital files. So I bought an Epson scanner, top of the range at the time. My impression on seeing the scanned image was: “It's all fuzzy.” At the time I had no idea at all that a scan needs sharpening — unsharp masking — afterwards.
From the sources' side, this is no surprise. A scanner's maximum resolution is a matter of the sampling grid, not of the amount of detail captured. Sharpening is a separate step — sometimes built into the scanner, sometimes applied by a person afterwards. But whether that fuzziness was the original, the scanner, or my own ignorance, I could not tell at the time.
What came next — not the output side, but the move of everything, shooting included, to digital — is for the next article.
For Those Who Want to Go a Little Deeper
The conclusions this article needs are complete above. What follows is supporting detail for those who want it — the grounds for things kept short in the main text, and the things that are not known. There are no new claims.
What the Lab Controlled
Kodak's literature for pro labs (Q-LAB) specifies the E-6 first developer at 38 °C ±0.2 °C for 6 minutes 00 seconds ±5 seconds, has the control strips read on a Status A transmission densitometer, and sets control limits on each of minimum density, low density, high density and maximum density (in the 1997 edition, for example: D-min +0.05, LD ±0.10, HD ±0.15, D-max −0.25). Control strips are to be read at least three times per shift, and if the color balance goes out of control, customers' film is to be stopped. These are the control limits of the process, not the actual distribution of variation between labs. Push and pull are deliberate variants of the process, and no universal rule of the form “a one-stop push loses this much resolution” was found in the sources. How Japanese labs actually operated is not known.
A Scanner's “Maximum ppi” and the Detail Captured Are Different Quantities
Linotype-Hell literature from around 1994 lists drum models at 10,000 ppi and 18,540 ppi alongside a CCD model at up to 8,000 ppi, and claims a density range of 4.2. SCREEN's DT-S1045AI claims up to 8,000 dpi, three photomultiplier tubes, 3.9D and 16 bits, while leaving aperture selection, the degree of sharpening, manual color and tone correction, profiles and output format as operator settings. Crosfield's 1998 patent treats the MTF of the original, the scanner's lens, the physical aperture, enlargement and editing, the monitor and the output separately. Input ppi, output ppi, aperture, interpolation, enlargement ratio, halftone screen ruling and effective resolution are all different quantities. Nor does the division “PMT is always high resolution, CCD always low” hold in the sources.
Halftone and Paper: 133 lpi Is an Example
Adobe's 1995 printing guide says the screen ruling is set by the resolution of the output device, the paper and the press, and gives 85 lpi for newspapers and 133 lpi for four-color printing on coated paper as examples. The same guide's formula for the nominal number of gray levels is (output dpi ÷ screen ruling)² + 1: at 1200 dpi, about 178 levels at 90 lpi and about 48 at 175 lpi. That is the number of cells inside one halftone dot, not the number of tones actually produced on press, nor the resolution of a continuous-tone image. The SWOP and CGATS characterization data are measurements under specific conditions of publication printing in the United States. Representative figures for the screen rulings and papers on which Japanese photo books and magazines were printed at the time were not recovered in this research.
“Handing Over the Original” in the Sources
Fujifilm's 1996 document on duplicating film lists, alongside viewing the original directly, the uses of duplicates for color separation and for phototypesetting. Adobe's 1995 printing guide carries a case in which a prepress house received a 4×5 original transparency, scanned it on a Scitex and printed it at 200 lpi. One case, not the share of the market at the time.
Duplication and Projection as Paths
Fujifilm's CDU II and Kodak's EDUPE are films for making same-size, reduced or enlarged duplicate transparencies from an original; they specify the light source, exposure, filtration and processing, and claim that color and gradation are held in the duplicate. That is the addition of a new process, not identity with the original. Kodak's projector literature treats flat-field and curved-field projection lenses, mounts, projection distance and screen conditions separately. Neither was on my path.
Sources
Nihon Arupusu no Shiki — the photo book of the mountain-photography group Shiki — was published by Tokyo Shimbun Shuppankyoku in April 1994 (National Diet Library record). What was in the book, and the exhibition of original prints, are my memory. Horiuchi Color is a company founded in 1959 as a color-film processing lab (company profile). That the shop was in Shimbashi at the time is my memory.
What Is Not Known
Here, together, are the things this article has treated as not known. On which scanner my photo book was scanned, at what screen ruling and on what paper it was printed. Who printed the exhibition prints, and how. The run-to-run variation of the lab. How Japanese labs operated. How common it was to hand over the original. The screen rulings and papers of Japanese photo books and magazines at the time. How much of the original's detail survived into the print or the printed page. How often transparencies were shown directly. The model and settings of my scanner. And what that “fuzziness” came from.
The Scope of This Article
The sources for this article are the words of manufacturers' technical literature, standards, patents and printing guides, not measurements. My experience is that of one amateur in Japanese mountain photography, mostly on roll film. “The finished photograph is the framed print” is my own view, not the answer of photographers in general. I cannot turn what the sources say — “what remains differs from path to path” — into “so a photo book is inferior” on the strength of my experience, nor can my experience be refuted by the sources. Both are left standing as they are, each on its own layer.