— I never compared the two on the same subject. And yet, from that day, the path I took changed.
I Put Together a Million Yen and Bought a D1
The previous article ended where I scanned an original transparency for my website. The scanned image was “all fuzzy,” and whether that was the original, the scanner, or my own ignorance, I could not tell at the time. This article is the sequel: the story of everything, shooting included, moving to digital.
Right around the turn of 2000, I bought a Nikon D1. The body alone was ¥650,000. Then you need lenses, batteries, software to handle RAW files, and memory cards. I looked up what was needed, put the money together, and the total came to more than a million yen. I paid in cash.
I heard a good deal of comment along the lines of: a million yen, for a toy like that? Some people around me still saw the D1 as something of a toy.
And Yet I Still Thought Film Was Better
Let me say this first. I did not buy the D1 because I thought it had better image quality than film.
If you printed film properly, I thought film was still ahead at that point.
So why did I buy it? This article answers that question.
Let Me Give the Answer Here
What I compared was not the performance of film against the performance of the D1. I compared the path I was actually taking with the path an acquaintance was actually taking, at the same endpoint.
From my side, it comes to this. When I set my path — send the transparency for processing, collect it, scan it, remove the dust and scratches one by one, print to A4 — beside my acquaintance's path — shoot on the D1, transfer the files, print to the same A4 — the acquaintance's output was sharper, with no dust and no scratches, and the work I would have wanted about a week for was finished in minutes. So I concluded that digital would certainly catch up with film, and might overtake it. I bought the D1 still believing film was better.
From the sources' side, it comes to this. The D1 was announced in June 1999 and released at the end of September. It could produce JPEGs in the camera, so its images could be handled without dedicated software. In news photography, what mattered was that the time spent on processing and wire transmission disappeared. On the other hand, a scanner's nominal resolution is not the amount of detail it captured, sharpening is a separate step, and the Epson flatbed scanner I was using at the time had no function for removing dust and scratches automatically. And how much image quality changed on which path is something the sources cannot tell us. This article does not say it either.
What I Compared: A Mountain Transparency and the D1 on the Streets of Tokyo
When I heard that an acquaintance had bought a D1, the question came up of which looked better: a scanned film file or a D1 file.
Let me be plain about this. It was not a comparison test. In my own room I scanned one of my own mountain photographs — probably a 6×9 or 6×12 Velvia transparency — and took the file with me. The D1 photographs were ones my acquaintance had taken while the two of us walked the streets of Tokyo. Different subjects, different photographers. What lens was on the camera, and whether the files were JPEG or RAW, I do not remember.
What was the same was the endpoint. At my acquaintance's office — a small publishing company — we printed both to A4 on the office color laser printer. I do not remember the model.
Before the comparison, I was sure mine would be the better-looking one. It was not.
The Scan Was Fuzzy and Covered in Dust
The D1 output looked better on two points. One was sharpness. The other was the absence of dust and scratches.
My scan, as I wrote in the previous article, was “all fuzzy.” Looking back now, it was the kind of soft-edged image that would need heavy sharpening before it was usable. At the time, I had no idea why it looked that way. Even now, I do not know which cause was responsible for that particular scan of mine.
From the sources' side, this much can be said. A scanner's resolution figure — so many points per inch — is the fineness of its sampling grid, not the amount of detail it captured. I wrote about this in the article on “How Many Megapixels Is 4×5 Film?”. On top of that, the lens, the focus, the glass surface, the flatness of the film — any of several factors can make a scan look softer than the original. That a scan looks soft does not mean the original held less information.
The dust and scratches were simpler. Whatever sits on the surface of the film is recorded as part of the image. I was removing them one at a time, by hand. That was the labor it took before a file was usable.
“Unsharpness? Is That a Filter That Makes the Picture Less Sharp?”
That a scan needs sharpening afterwards was something I did not know at all at the time.
I had seen the item “Unsharp Mask” in the retouching software's menu. And I genuinely thought this: Unsharpness? Is that a filter that makes the picture less sharp?
It was the name. “Unsharp mask” comes from a darkroom technique. You print the original through a deliberately blurred — unsharp — mask laid over it; the large areas of light and dark cancel out, and only the fine edges are emphasized by comparison. It is the mask that is unsharp; the result is sharper. Digital software works on the same principle, adding the difference from a blurred copy back in to strengthen the edges.
But what sharpening restores is the visibility of edges that were weakened along the way. It cannot create detail that was not in the original. That my scan looked soft is no proof that the original lacked detail. And the fact that I did not know sharpening was a step at all must have been one of the factors. How much each factor contributed, I do not know.
What the Same A4 Color Laser Could and Could Not Tell Us
One more thing needs to be clear. An A4 print from an office color laser printer is not where the final image quality of a photograph is measured.
A color laser builds tone out of dots of toner. It is not a continuous-tone print; both detail and gradation stay within a range the printer decides. Because both images went through the same printer, I could get a sense of the difference. My acquaintance's print was, in my words at the time, good enough to get a rough idea. But that is neither the maximum image quality of film nor the maximum image quality of the D1.
That day, I thought my acquaintance's output was the better-looking one. But I did not turn that into the conclusion “the D1 has better image quality.” The conclusion I reached was: “on my path, there is no beating the D1's path.”
A Week Became Minutes
“No beating it” was not only about image quality.
My path went like this. Send the exposed film for processing. Go and collect it. Scan it. Remove the dust and scratches one by one. Tidy up the data, and use it. I would have wanted at least about a week for this path. That is my own estimate, not a number anyone measured.
My acquaintance's path went like this. Shoot on the D1. Transfer the images. That was more or less it. In my memory, it took minutes.
After the comparison, I moved at once. The one or two months it took were not a period of hesitation. From first seeing the D1, it took that long to find out what was needed — lenses, batteries, RAW processing software, the rest of the kit — to put the money together, and for the camera to arrive. As far as I was concerned, I bought it as fast as I could.
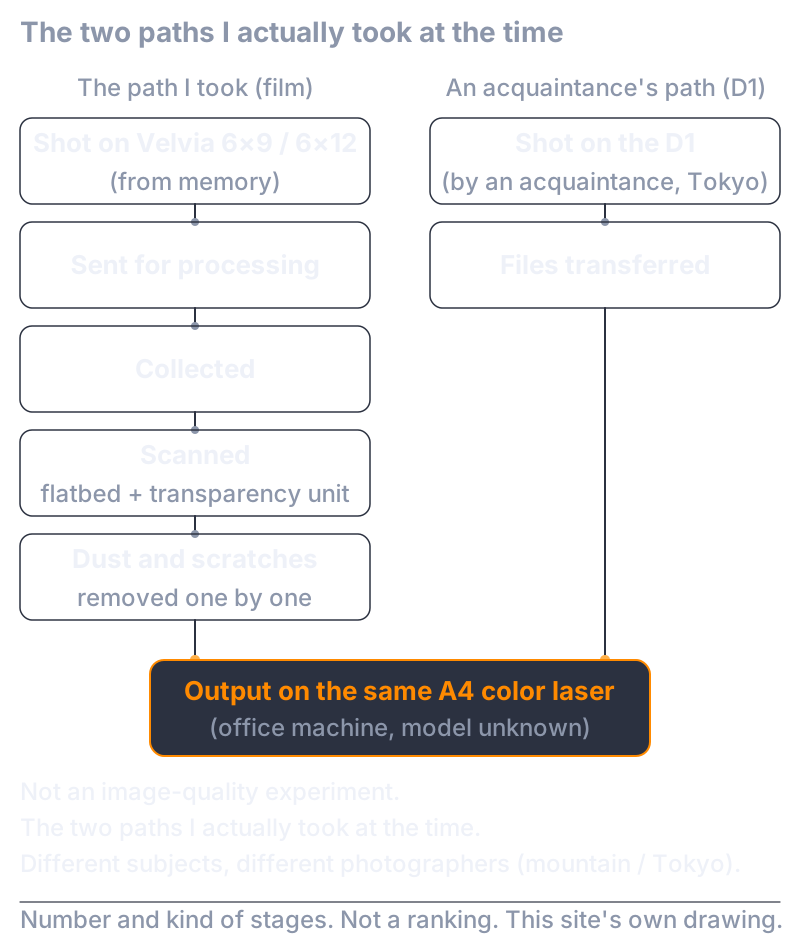
Fig. 1: The two paths I actually took at the time. On the left, film — shot on Velvia 6×9 / 6×12 (from memory), sent for processing, collected, scanned, dust and scratches removed one by one. On the right, the D1 — shot by an acquaintance on the streets of Tokyo, files transferred. Both were output on the same A4 office color laser (model unknown). The figure shows the number and kind of stages; it is not a ranking. It is not an image-quality experiment: the subjects and the photographers were different. This site's own drawing.
What the D1 Was in 1999
Here, from the sources' side, is where the D1 stood.
The Nikon D1 was announced on June 15, 1999, and released at the end of September. The body's list price was ¥650,000 — twice the price of the F5, the flagship film SLR of the time, and, considering that professional digital SLRs until then had cost several million yen, a fraction of that. The image was 2,000×1,312 pixels. It could produce JPEGs in the camera, with TIFF and 12-bit RAW also available. Handling RAW required separately sold software.
In Nikon's own retrospective, the D1's value showed most clearly in news photography: the time spent processing film and wiring images disappeared, pictures could be checked on the spot, and photographers could keep shooting right up to the deadline. The same retrospective names the early D1's noise as a weakness. The relationship between noise and the amount of light is as I wrote in the article on “Does Raising ISO Really Increase Noise?”.
I am not a news photographer. I photograph mountains and make work from them. Even so, what I saw at my acquaintance's office was the same kind of thing that was happening in news photography. The decisive difference was not maximum image quality. It was the path from capture to usable output.
I Thought Digital Would Catch Up
Let me put the pieces back together.
Film was still better. Sorted out, it comes to this: film could still come out ahead — but it no longer looked as if it could stay ahead. That is this series' way of putting it. In words close to my own at the time: digital would certainly catch up with film, and might overtake it. That is today's me restating what I saw then.
I did not think then, and do not think now, that “the D1 beat film.” That comparison used different subjects and different photographers, and its endpoint was an office printer. Even so, the difference between the paths was visible enough under those conditions.
After I bought the D1, film did not disappear at once. For about a year I used 4×5, 6×9 and 6×12, and the D1 side by side. It is not a story of throwing film away one particular day.
Where Image Quality Was Decided Began to Move
Finally, let me set this event in the terms this series uses.
On the film path, there were several places after the shutter where image quality was managed: the lab, the original itself, the scan, the dust removal, the output. As I wrote in the previous article, the original became the source of the photo book and of the exhibition prints alike, and what remained differed from path to path.
On the D1 path, some of those places disappeared and some moved elsewhere. The lab was no longer needed; the original as a physical object was no longer needed; the scan and the dust removal were no longer needed. In their place, the sensor, the in-camera processing, RAW processing, the monitor, and digital output became the places where image quality was decided. As I felt it, it was as if film had been replaced by RAW processing software, and what the pro lab used to do, I now had to do myself. That is what began here.
“The places where image quality is decided moved” is this series' way of organizing things, not a phrase anyone used at the time. Going digital did not remove the management of image quality; it changed where it happened. That is the sources' side of this article's answer.
So, once the shooting itself became digital, where did image quality come to be decided? The lens stayed the same, yet what was asked of the lens changed. That is for the next article.
For Those Who Want to Go a Little Deeper
The conclusions this article needs are complete above. What follows is supporting detail for those who want it — the grounds for things kept short in the main text, and the things that are not known. There are no new claims.
The D1's File Formats and How It Was Received
The D1 recorded JPEG at three compression levels, TIFF in RGB and YCbCr, and 12-bit RAW. The medium was CompactFlash (Type II), not included with the body. It connected over IEEE 1394, and handling RAW required the separately sold software Nikon Capture (¥50,000). Reviews at the announcement singled out the in-camera JPEG — data that could be handled “just like an ordinary digital camera” — as the difference from the professional bodies before it, which recorded in proprietary formats and needed dedicated software on the computer. Whether the images my acquaintance used in the comparison were JPEG or RAW, I do not know.
A Scanner's Nominal Resolution and Softness (In General)
For prepress scanners, I wrote in the previous article's supplement that sampling resolution (ppi), scanning aperture, magnification, and sharpening are separate quantities. The same applies when a consumer flatbed scanner with a transparency unit reads 6×9 or 6×12 film. In addition, the resolution of the lens and CCD, any offset between the focal plane and the film, curl in the film, scatter at the glass surface, and whether the scanner applies its own sharpening each affect how the edges look. The model of my scanner, its settings, and the software's default sharpening I do not remember. So this article does not pin down which factor was behind my “fuzzy” scan.
What I do remember about my scanner is this: an Epson flatbed with a transparency unit, connected over SCSI, costing somewhere around ¥200,000–300,000, in Epson's top class at the time. I bought it around 1997 or 1998, before I saw the D1. It came bundled with a great deal of software.
Where “Unsharp Mask” Comes From
Unsharp masking originates in a darkroom technique: a deliberately blurred, low-contrast mask is laid over the original for printing. Because the mask is blurred, the large areas of light and dark cancel between mask and original, only the fine edge information survives, and the print looks sharper. Digital unsharp masking adds the difference between the image and a blurred copy back into the image, controlled by amount, radius, and threshold. It is customary to apply it to scanned images; overdone, it produces halos along edges and increases noise. What it recovers is edge contrast weakened along the way; it does not create detail that was not in the original.
Dust and Scratches, and When Automatic Removal Arrived
Dust, scratches, mold, and fingerprints on the surface of the film block or scatter the transmitted light, so a scan records them as part of the image. Among consumer products, an early example of automatically detecting and correcting these was Nikon's LS-2000 film scanner (35mm and APS, ¥198,000), released in April 1998, which carried a function for detecting and correcting scratches, dust, mold, and fingerprints — the method later known as Digital ICE. The first Epson flatbed scanner to carry this function was the GT-X800 of October 2003. The Epson flatbed I was using around 1997–2000 had no automatic removal of this kind. That is why I was removing them one by one, by hand.
On Office Color Laser Printers
An office color laser printer builds tone from the size and placement of toner dots; it is a different thing from a continuous-tone photographic print. Detail and gradation are decided by the fineness of the dots, the printer's color conversion, and the paper. Putting two images through the same printer gives a sense of the relative difference, but that difference is conditioned by the printer's limits. The model, resolution, and paper of the printer at my acquaintance's office I do not remember.
Sources
The Nikon D1's announcement date, release timing, price, file formats, recording medium, interface, and separately sold software are from the trade-press report of the June 15, 1999 announcement, the September 1999 report on the production model, and Nikon's corporate history page on the D1 (Japanese; its title says, roughly, “D1: bringing the professional field into the digital age”). Its value in news photography, noise as a weakness, the price being twice the F5's, and professional bodies before it costing several million yen are from that same page (Nikon's own retrospective). The release timing and features of the Nikon LS-2000 and the Epson GT-X800 are from trade-press reports of 1998 and 2003 respectively. The origin of unsharp masking is from general photographic literature. My path, the circumstances of the comparison, the times, the costs, and the overlap afterwards are my own memory.
What Is Not Known
Here, together, are the things this article has treated as not known. Whether the film I compared was 6×9 or 6×12. The lens and file format of my acquaintance's D1. The model and resolution of the color laser printer. The model of my scanner, its settings, and the software's default sharpening. The breakdown of the factors behind the softness of my scan. The day I first saw the D1, the day of the comparison, and the day I bought it. The breakdown of the sum above a million yen. The exact length of the period in which I used film and the D1 side by side. And how many of Japan's landscape photographers of the time moved to digital in this period.
The Scope of This Article
The sources for this article are the manufacturer's corporate information, the trade-press reports at the time of the announcement, and the language of scanner technical documents — not measurements. My experience is what a single mountain photographer saw, on the scanner in my own room and the printer in an acquaintance's office. It is not an experiment comparing the performance of film with that of the D1. “Film was still better” is my understanding at the time, and “it would catch up, and might overtake” is my judgement at the time. Neither is something the sources say; both are what I saw. The sources' own “how much changed on which path is not known” is left standing as it is.