— Buying a good lens did not yet give me a photograph. From the ground glass to the film.
A Good Lens Did Not Yet Give Me a Photograph
In the previous article I wrote about what large-format lenses were designed for. The image circle, the resolving power, the contrast, the color — all of that was about the image a lens can make. But at the moment the lens has made its image, there is no photograph yet.
Among my originals there are frames that are completely black. Those are frames where I forgot to pull the dark slide that covers the film, and fired the shutter. There are frames that are completely white, too. Those are frames where I pulled the dark slide with the lens shutter still open. The lens did nothing wrong. The image must have been sitting right there on the ground glass, in focus. And yet nothing reached the film.
These are extreme examples. But between the image the lens makes and the image that stays on the film, there is the ground glass, there are the movements, there is the back the film goes into, there is the tripod and the wind — and there is me. Even with a good lens, a precisely made camera and a fine-grained film, the image can be lost somewhere along that path. So was large-format image quality just about the lens? This article walks that path, step by step, from the image the lens makes to the image that stays on the film.
Let Me Give the Answer Here
It was not the lens alone. Large-format image quality came into being on the film only when everything held — the image the lens made, seen on the ground glass; the plane placed by going back and forth between the movements and the focus; the hand-over to film that should sit exactly where the ground glass sat; the tripod; the wind ridden out; the dark slide pulled and the film wound on.
The Sinar literature of the 1980s and the manuals from Horseman, Linhof and Toyo treat each of these as something to be controlled: push the holder all the way in; lock the rail after focusing; refocus after applying movements; add support when the bellows is extended a long way; cut the light from a bright sky with a hood. What they do not tell us is how much image quality was lost when those things were neglected, or how faithfully the photographers of the time followed them. This article will not put a size on it either.
What I can do is describe what happened along that path in my own case. The mistakes that kept recurring I pushed out into procedure and equipment. Even so, some things remained that I could do nothing about — the wind, for one.
The Image Appeared First on the Ground Glass
A bellows camera — a large-format view camera — has no viewfinder. The image the lens forms appears on a sheet of ground glass placed exactly where the film will later be, upside down and reversed left to right. The photographer looks at it from behind and decides the composition and the focus.
The ground glass on the Ebony I used was very bright and clear. In my memory it was brighter than the optional bright screen from Linhof. If I held the glass in my hand and touched a finger to the back of it, I could see my fingerprint clearly through it. That is my impression, not a transmission figure. But thanks to that brightness, the peak of focus was easy to see. Where you would normally throw a dark cloth over your head, with the Ebony a focusing hood was usually enough. The exception was direct sunlight falling on the ground glass from straight behind; then it became hard to see.
I focused with the aperture wide open and with the naked eye. That is not to say I never used a loupe. When you use movements, you have to decide them while looking at the whole frame; a loupe shows you only a tiny part of it. So in the early days my order was: look at the whole frame with the naked eye and set the movements, check the important parts with a loupe, and fine-tune if needed. What I found was that checking with the loupe hardly ever led to a fine-tune that meant anything. So I stopped doing that final loupe check as a matter of routine.
This is my experience, with this camera and this ground glass. The manuals say to use a loupe and a hood to drive the focus into the corners. I am not saying a loupe is unnecessary. I did look at the developed originals with a loupe on a light table, but as I wrote in the article on the circle of confusion, that is a different situation from focusing at the time of shooting.
Movements Solve One Problem and Show You Another: My “Aori-boke”
Camera movements are the operations of tilting or shifting the lens or the film plane. They were the reason for using a bellows camera at all. In the previous article I wrote that I used to call the “focus shift” after movements aori-boke. Let me put that more precisely here. What I meant was not that the focus went wrong, but that whatever lay outside the plane I had placed went soft.
A concrete scene. An alpine flower about a metre away, and Yari-ga-take, effectively at infinity; I want both sharp. If ordinary depth of field will do it, no movements are needed. If it will not, I tilt the lens forward a little and lay the plane of sharp focus down. Then a single oblique plane can pass from the ground near my feet to the distant mountain. Flower and summit both come sharp.
But the region of acceptable focus exists only around that plane. On either side of the tilted plane, depth of field comes along in the shape of a wedge that widens with distance. That is how the standard optics of a bellows camera describes it. And a real landscape is not a single plane. Parts of it that lie away from the plane through the flower and the summit — the valley in between, for instance — can fall outside that wedge. When they do, the valley may become softer than it would have been under a different focus arrangement. The near flower is sharp, the distant peak is sharp, and the valley between them goes soft. That is the state I used to call “aori-boke.” It is my own word, not a term from optics.
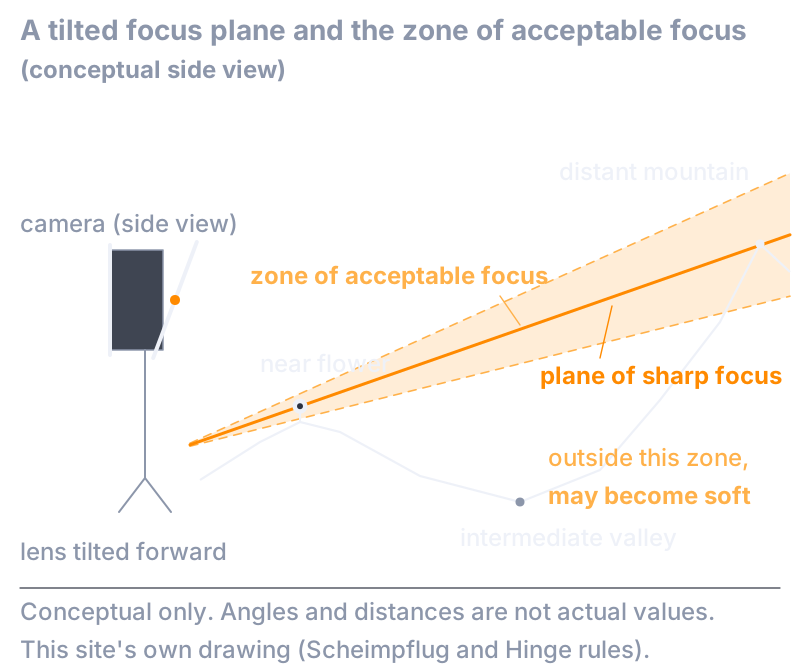
Fig. 1: A conceptual side view with the lens tilted forward and the plane of sharp focus placed through a near flower and a distant mountain. The zone of acceptable focus lies on both sides of that plane, in a wedge that widens with distance. Parts outside it, such as the valley in between, may become softer than under a different focus arrangement (not necessarily). I used to call this state “aori-boke,” but that is my own word, not an optical term. Angles and distances are not actual values.
So movements and focusing were never a job done once each, in order, and finished. Apply the movement, focus, look at the whole frame, adjust the movement a little, focus again, look at the whole frame again — and repeat until you are satisfied. The Horseman manual says the same thing: after moving tilt or swing to the front standard, a small refocus is always required. In my words, the ground glass was not so much a place to confirm focus as a screen on which the image was worked in, going back and forth between the movements and the focus.
Did the Image on the Ground Glass Reach the Film As It Was?
Does the image you focused on the ground glass reach the film exactly as it was? Here there are two layers: what holds in principle, and my experience.
In principle first. The position of the ground glass and the position of the film's emulsion surface are not set by the same part. The ground glass sits in the camera's rear standard; the film sits inside the holder or back you slide in. The position of the ground glass, the surface the holder seats against, the position of the film inside it, and the curl of the film itself — these are separate quantities. The Sinar manual of the 1980s says that a holder not pushed fully home causes focus error and light leaks, and the Horseman manual warns that if the spring adjustment of the rear standard loosens, the ground glass can shift slightly. In other words, the makers themselves saw the relative position of ground glass and film as something to be controlled. So how large was the actual error? The sources of the time contain no cross-maker measurement of it, and this article gives no figure either.
Next, how I thought about it. My Ebony body and my Horseman roll-film back (roll-film holder) were products of two different companies. Each was made to its own drawings and specifications; this particular body and this particular back were never physically matched and adjusted together. Being industrial products, each moves within its own tolerances. So it seemed to me unreasonable to assume that the assembled system had zero error in the position of the focus plane. This is my reasoning, not a measurement of my own camera.
Finally, my experience. I have no memory of that theoretical worry becoming a problem in an actual photograph. Focus set by the naked eye looked fine under the loupe on the developed original. That is not proof that there was no error; it is one example in which my way of working did not run into it. Let me add one thing: I normally shot at f/22. For the same positional offset, the smaller the aperture, the smaller the diameter of the blur. It is possible that my aperture was, in effect, a margin against positional error. Possible — and no more than that.
A brief word on stray light, too. The manuals say that when light from the sun or a bright sky enters the lens, contrast and sharpness fall even with a good lens, and they recommend a hood or a compendium, with conditions attached. Shading the lens I touched on in the previous article. As for reflections inside the bellows, I found no source showing their effect. My understanding was that the shape of the folds makes direct reflection from the lens side to the film side unlikely. I cannot say more than that.
I Hardly Ever Used 4×5 Sheet Film
Here is something that may differ from what readers imagine. I used a 4×5 camera, but I shot 4×5 sheet film only for the first few dozen frames. After that, effectively everything was on 120 roll film.
When I was about to move up from 35 mm to a larger format, my thinking went like this. Buy a 645, find it not enough, buy a 6×7, find that not enough either, then 6×9, then 4×5 — that was the route I seemed likely to follow. Rather than buy each of those camera systems in turn, it was cheaper overall to choose one 4×5 body first and add 6×7, 6×9 and 6×12 roll-film backs to it. And it let me choose the format according to the image quality a given photograph needed. There was one more reason. With a 65 mm on mountain subjects, 6×9 takes in a good deal of sky and foreground that I do not use. With 6×12 the same lens gives a wide horizontal composition and lets me leave that top and bottom out. The economic reason, the image-quality reason and the compositional reason are three separate things. I was not always going for the largest original; I was keeping the choice open.
So to the question “was 4×5 film flat?” I cannot answer from my own experience. The 1986 Sinar manual goes as far as the drying and temperature of the film and how to tap the frame after pulling the dark slide; a patent filed in 1988 and published in 1990 deals with a mechanism for holding down film curl; a catalogue for precision holders states error figures. All of that is about sheet film, and it shows that the makers of the time saw flatness as a variable to be controlled. The figures are claims within those documents, not measured values for large format in general. The flatness of roll film, and the positional accuracy of roll-film backs, I have not looked into. I leave that open.
Even With the Focus Set, the Wind Does Not Wait
The manuals say: lock the rail once you have focused; add a support in the middle when the bellows is extended a long way; use a cable release. So far, these are things that can be controlled.
On the ridges of Japan's Northern Alps I sometimes shot in what I remember as winds of 20 to 30 m/s. It was like taking photographs inside a typhoon. Camera and tripod being blown over together was nothing unusual. The camera bag I used as a weight once flew off into the valley. The bellows was buffeted like a kite, and the tripod hummed and shook. In that state a cable release does not solve the main vibration. Pressing the shutter on the lens directly is dangerous, too: the wind moves your hand itself by several centimetres, and you could smash the shutter.
What I did was wrap my body around the camera, holding the whole system down, and release the shutter. Whether that stopped the shake was a matter of probability. So I shot many frames, to raise the odds that some of them would come out unshaken. With luck, a frame came out without shake. That is the honest truth of that ridge. Waiting five or ten minutes for the wind to drop was, of course, something I also did.
These were my conditions. That wind was not normal for large-format work. But even with a good lens, correct focus and the film in the right place, if the whole camera moves, the image does not stay. And conditions like the wind were not something that procedure or equipment could remove.
The Most Troublesome Component Was Me
The wind comes from outside. But most of the reasons an image never reached the film were not outside. They were me.
Getting the exposure wrong. Pulling the dark slide with the lens shutter open and making a white frame. Forgetting to pull the dark slide and making a black frame. Forgetting to wind on the roll film and making double or triple exposures. I think anyone who used large format will recognize these. Everyone does them once — the standard mistakes. That is not a statistic; it is how we talked among ourselves.
What to do about them? My first answer was: be careful.
Pushing Mistakes Out of the Process
But being careful was not enough by itself. When I saw that I was likely to repeat a mistake, I changed the procedure or the equipment instead. Fail, then fix it. That is all.
Take winding on. My rule was: as soon as the shutter has fired, wind on. Not: wind on just before the next shot. If you get ready to shoot, wind on, and then decide not to shoot after all, it becomes ambiguous whether this film has been advanced or not. If the rule is “expose, then wind on immediately,” the state of the film is always one thing.
Unexposed film and exposed film go into separate bags. Lens caps all look alike, so I put label-maker tape with the focal length on each, to be able to tell them apart instantly inside the bag. When there was unlikely to be time to change film, I kept two 6×12 backs ready. With each of them set so that two frames could be shot, I could go on for four frames in all without reloading, and reload both when there was a pause. Each of these is a small thing, but what they have in common is that they spare me from thinking it through again every time on location. Tired, with judgment slipping, I would still be less likely to slip up, because the decisions had been moved in advance into the equipment and the procedure.
If I had to put it in one line: nobody gets me with the same trick twice. The first time, it gets me. But before the next time, I have done something about it. I could not prevent everything — but I would not walk into the same thing again with no plan. That, more or less, is how the way I worked came to be.
“Like Tea Ceremony,” I Was Told
This was while I was shooting near a mountain hut in the Northern Alps. There were a lot of people around, but I did not pay them much attention and shot the way I always did. When I had packed up the camera and was about to go into the hut, a woman came up to me.
Her husband, she said, was shooting nearby with a similar bellows camera. She had been watching me work, and she said it was very different from the way her husband shot. She practiced tea ceremony, and watching me had reminded her of it: the movements were smooth, there was no visible hesitation, and it looked as if what came next had already been decided. Tea ceremony has a fixed order, so once you learn it you can follow it; photography ought to be different, because the situation keeps changing — and yet that was how it looked. Her husband, she said, shot in a much more hurried way. That was the gist of what she said.
At the time I only thought: so that is how it looks. Looking back now, I think what looked from the outside like a set form was the result of my having moved decisions into the procedure and the equipment so that I would not have to think. She did not say that. That is my reading. What she was watching was how I moved, not how the photographs turned out.
Not the Lens Alone — Then What?
Was large-format image quality just about the lens? The lens had a great deal to do with it. As I wrote in the previous article, the quality of the image a lens could make rested on the image circle, the resolving power and the color. But what the lens did stopped at making the image.
Before that image stayed on the film, there was seeing it on the ground glass; placing the plane by going back and forth between the movements and the focus; the absence of any guarantee that the ground glass and the film were in the same position; the flatness of the film; the tripod and the wind; and myself, pulling the dark slide and winding on. The makers' literature of the 1980s treats each of these as something to be controlled. How much each of them took away from image quality, the sources do not say. In my case, the mistakes that kept recurring I pushed out into procedure and equipment.
At the same time, some things did not go away. The wind on the ridge stayed. The tolerances between body and back never became zero. I went on making mistakes afterwards. So a high-quality photograph was not made because any one component was perfect. It was made when the whole path from the lens to me worked well enough for that one frame.
Where the original went after the image was on the film, and where the photograph was finished, I wrote about in the next article.
Then, on a high-resolution camera of 2026, which parts of this path have disappeared, and which remain? On a camera with no ground glass, no holder and no dark slide, what happens between the lens and the image that stays on the sensor? That is for a later article.
For Those Who Want to Go a Little Deeper
The conclusions this article needs are complete above. What follows is supporting detail for those who want it — the grounds for things kept short in the main text, and the things that are not known. There are no new claims.
The Parts Between the Ground Glass and the Film Plane
Here, in order, are the things the main text called “separate quantities”: the front standard carrying the lens; the rail and the bellows; the rear standard; the ground glass; the surface the holder or back seats against; the emulsion surface inside it; and the local buckling of the film itself. The research for this series treats these as one stack, under the rule that the position of the ground glass and the position of the emulsion surface are not taken to be the same quantity. The 1986 Sinar manual, the Horseman L-series manual, the Linhof Master Technika manual and the Toyo Field manual each list, as items to control, the seating of the holder, the springs of the rear standard, the locking of the rail and the support of a long bellows. The publication years of the Horseman, Linhof and Toyo manuals have not been established.
The Same Offset, a Different Blur at a Different Aperture
When the image plane is displaced by Δz, the diameter of the blur is roughly Δz divided by the f-number. That is a paraxial geometric approximation, not a measured value. A Sinar catalogue for precision holders (year of publication unknown) claims ±0.03 mm, and says conventional holders can be 0.3 mm or more; the Toyo manual gives a figure of 0.003 inch (about 0.076 mm). All of these are makers' claims; the test conditions are not known, and they are not representative values for large format in general. If, for the sake of illustration, that 0.3 mm is taken as a pure displacement along the optical axis, it gives a blur diameter of about 0.04 mm at f/8 and about 0.014 mm at f/22. That is an example for comparison with the 0.1 mm that Sinar used as the circle of confusion for 4×5, not a statement about my camera.
The Tilted Focus Plane and the Wedge-Shaped Zone
Where the plane of sharp focus ends up when the lens is tilted is set by the Scheimpflug principle and by the rule that pairs with it (Merklinger's Hinge Rule). The amount of tilt fixes the position of the axis of rotation — the hinge line — and racking the focus swings the plane about that axis. The zone of acceptable focus widens on either side of that plane in proportion to distance, measured parallel to the film plane. The “wedge” in the main text is this shape. The explanation here follows the technical pages Harold Merklinger has published on the web (the explanatory pages by the author of Focusing the View Camera, accessed in 2026). His book itself was not read for this article. No numerical examples have been applied to the scene in this article.
How the Sources Treated Sheet-Film Flatness
The 1986 Sinar manual says: push the holder fully home; keep the film dry; avoid sudden changes of temperature; and, after pulling the dark slide, tap the frame lightly to release tension in the film. Sinar's patent, with a 1988 priority date and published in 1990, deals with a mechanism inside a sheet-film cassette that fixes the edges of the film first and then presses the exposure area flat. ISO 1012 (the 1991 and 1998 editions) defines the dimensions of sheet film; it does not define the flatness of loaded film or the depth of holders. Roll-film backs were outside the scope of the research for this article.
On Reflections Inside the Bellows
To restate the three things the main text kept apart. What the manuals recommend is cutting light that enters from outside, with a hood or a compendium. A design explanation that the shape of the bellows folds itself reduces internal reflection was not found in primary sources in this research. That I understood the folds as making reflection unlikely is my own understanding. How much reflection inside the bellows actually affected photographs is not known.
What Is Not Known
Here, together, are the things this article has treated as unknown. How far the ground glass and the emulsion surface were actually out of position on the cameras of the time. The flatness and positional accuracy of the film in roll-film backs. The effect of reflections inside the bellows. How much wind and vibration moved the image. Whether the 20 to 30 m/s I remember was accurate for that day and that place. The specifications of the Ebony ground glass. What the state I called “aori-boke” actually looked like in any specific frame. And how faithfully the photographers of the time followed the procedures written in the sources.
The Scope of This Article
The sources for this article are the words of makers' manuals, catalogues and patents, not measurements. My experience is that of one person, in Japanese mountain photography, mostly on roll film. What the sources wrote as items to control cannot be rephrased, from my experience, as “what actually happened,” and my experience cannot be refuted by the sources. Each is left as it is, as a matter of its own layer.