Don't let the ISO number decide your image quality.
On social media, I've seen a few people insist that they "only ever shoot at ISO 50." I didn't ask them why. But to me it looked like the idea was, "that's obviously the best quality."
I understand the feeling. We're told that the lower the ISO, the less noise. So the lowest number should give the cleanest picture. It's a natural way to think.
I myself start every shoot at ISO 100 and f/8. So do I, too, believe that the lowest ISO gives the cleanest picture? This time, using AI to re-examine this piece of common sense, I was finally able to put into words how I actually work.
Let me say this first: I don't choose ISO 100 and f/8 because they are the "best" settings. This article starts from there.
"Lowering the ISO" Can Mean Two Different Things
The sentence "I lowered the ISO and got a cleaner picture" actually mixes together two different events.
The first. In a dark place, you set up a tripod and lowered the ISO. You made the shutter speed longer to match. The sensor is receiving more light than before.
The second. In bright daylight, with the aperture and shutter speed left as they were, you lowered only the ISO number. The amount of light reaching the sensor is the same as before.
Both are "lowering the ISO." But what is happening is different. In this article, I'll keep these two apart.
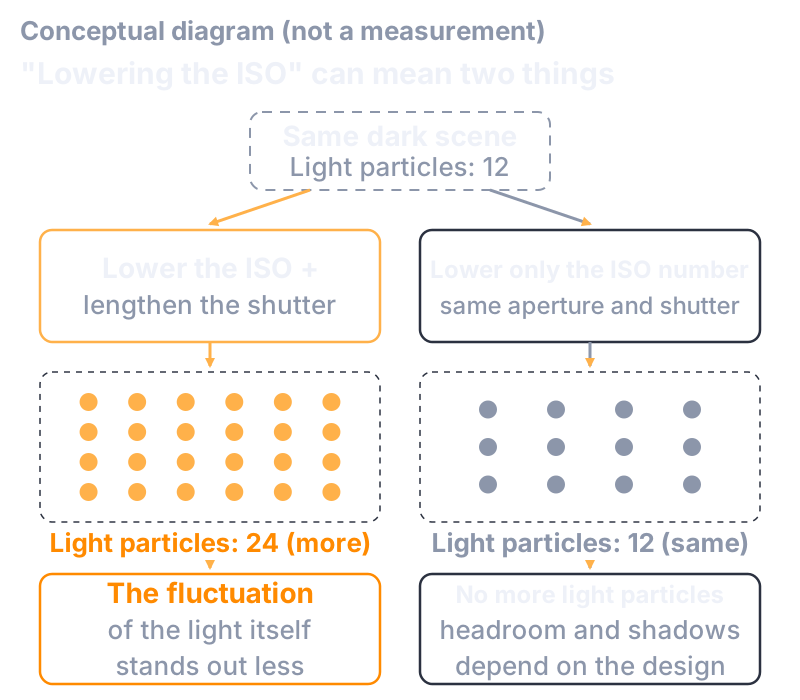
Figure 1: "Lowering the ISO" can mean two things. On the left, a longer shutter speed collected more light; on the right, only the number was lowered and the amount of light didn't change. It is the left that can get better, and the reason is the light that was collected (conceptual diagram).
Let Me Give the Answer Here
The lowest ISO doesn't always give the best image quality.
If lowering the ISO let you use a longer shutter speed and collect more light, image quality can get better. But what made it better was not "the low ISO number." It was the light you collected.
With the same amount of light, lowering only the ISO number does not do the same thing.
This is the most important point in this article. Below, I'll look in turn at the situations where you can collect more light, the situations where you can't, and the real advantage of a low ISO.
When You Can Collect More Light: On a Tripod
In the previous article, which looked into whether raising ISO really increases noise, I wrote that the main reason noise stands out is the small amount of light — that if you can collect more light, you collect it, and if you can't, you raise the ISO to what you need. This article picks up from there. When you can collect more light, what is a low ISO actually doing for you?
Light arrives as particles. The more particles there are, the less the fluctuation of the light itself stands out. If the camera is on a tripod and you can use a longer shutter speed, then for every step you lower the ISO you can expose that much longer and collect that many more particles. This is when image quality can get better.
That is how I work, too. In dark conditions where I would otherwise need something like ISO 6400, if a tripod lets me lengthen the shutter speed, I lower the ISO. Not because I want a smaller number, but because it lets me collect that much more light.
There are conditions, though. The subject must not be moving. The bright parts must stay within the range where they don't blow out to white. And it isn't the case that the longer the exposure time, the better. In long exposures, heat-related noise and hot pixels increase separately. Some kinds of shooting, like star landscapes, have limits on the exposure time itself. I wrote about exposure time in a separate article.
Even so, if you have a tripod and a still subject, lowering the ISO and collecting more light is the most straightforward choice.
When You Can't Get More Light: Handheld, and Things That Move
So what about when there is no tripod?
You're shooting handheld. Lower the ISO, and the shutter speed gets slower to match. As long as you can still afford to slow it down, there is more light. But if you slow it to the point where camera shake appears, the noise goes down and the picture blurs. Less noise doesn't count for much as "image quality" if the picture is blurred.
You're shooting something that moves. Children, animals, vehicles. The shutter speed is fixed by the need to freeze the subject. In this case, lowering the ISO doesn't let you lengthen the shutter. There is no more light. The image just gets darker. Lower the ISO here, and in terms of light you have gained nothing. Raising the ISO to what you need is the practical choice here.
Speaking from my own experience, I have no memory of a failure that came from insisting on a low ISO. The opposite has happened: I could have got the shot without any trouble by raising the ISO, and I failed because I forgot to raise it.
When you can't get more light, lowering only the number does not make things better in terms of light.
The Real Advantage of Low ISO — and the Trap of Expanded ISO
Reading this far, you may be wondering, "So is there no advantage to a low ISO at all?" That's not it. There can be.
When shooting with the same light, a lower ISO can leave more headroom on the bright side — more distance to clipped highlights. In scenes where you want to protect clouds, snow, or a backlit sky, this is an important advantage. How much headroom remains, though, differs by camera and mode.
Conversely, on some cameras a slightly higher ISO can give cleaner shadows. This is another reason we can't say "the lower the ISO number, the better" (more on this in the second half).
On top of that, there is one trap. Some cameras have an "expanded" low ISO below the normal range — settings like ISO 50, shown as "L" or something similar. The number is the lowest of all. So is that the cleanest?
Not necessarily. On some models, the manufacturer's own manual says that the headroom on the bright side shrinks at the expanded low ISO. "The lowest number" isn't necessarily "the baseline." Which models behave which way is something you can only confirm in that model's manual (the technical side and the actual examples are gathered in the second half of this article).
I basically don't use expanded settings like ISO 50. The reason is that I think there are cases where you don't get the camera's full performance from them. But I don't think they're forbidden, either. You badly want a slow shutter speed, but you don't have an ND filter. You don't want to move the shutter speed or the aperture. In a situation like that, with no other option, I use it. If I can use an ND filter, I choose the ND filter.
While I'm at it: in the film era, I used Velvia, an ISO 50 film. But I didn't choose it thinking "ISO 50, so it's better quality than ISO 100." I chose Velvia because it was a high-quality film, and its speed happened to be 50. That's all.
So How Do I Decide the ISO? Shutter Speed and Aperture Come First
"Fix the lowest ISO first, and fit everything else around it." That is not how I work.
First, I decide what photograph I want. If there is an intention behind the shutter speed — to blur the motion, or to freeze it — the shutter speed doesn't move. If there is an intention behind the aperture — to blur the background, or to get everything in focus — the aperture doesn't move.
When the exposure needs adjusting, my first candidate is the shutter speed, if the shutter speed can do it. Next, the aperture. And when I don't want to move either of those two, I move the ISO. For me, the ISO is what gets decided after I have thought about what the shutter speed and the aperture mean for the picture.
It's the same when I want to protect the highlights. Deliberately underexposing so that the bright parts don't blow out is something I do all the time. But I don't think of it as something I do "by lowering the ISO." I decide it with the aperture, the shutter speed, the ISO, or a combination of them.
If I'm already shooting at ISO 100, lowering the ISO further from there is not something I make into a goal. If I need to, I adjust with the shutter speed or the aperture. To sum up how I work: not "the lower the ISO, the better," but "what does lowering the ISO get me — for the shooting, and for the image quality?"
One more thing to add: shooting dark at a low ISO and brightening it later in processing is not something I normally do.
This is how I work, not a rule for everyone. But I myself don't fix the ISO first as a "ranking of image quality"; I decide the exposure by thinking about what the shutter speed, the aperture, and the ISO each mean.
My Starting Point Is ISO 100 and f/8. But That Isn't the Goal
Back to the beginning. When I start shooting, I start from ISO 100 and f/8.
But that isn't because ISO 100 gives the best image quality, or because f/8 does. I've simply set them as a starting point. I move from there depending on the photograph I want.
Keeping to the lowest ISO is not the goal. Decide the shutter speed and aperture the photograph needs, and choose the ISO within those conditions. Lowering the ISO makes things better only when it lets you collect that much more light. If you can't get more light, lowering the number doesn't do the same thing.
Don't let the ISO number decide your image quality.
For Those Who Want to Go a Little Deeper
Everything you need for shooting is above. What follows is a supplement for readers who want to look a little more closely at the places where I said "depends on the design" or "on some cameras." It adds no new claims.
Four Ways to Compare
The question "Which gives better image quality, ISO 100 or ISO 800?" can't be answered until you decide what to hold fixed. Here are the ways of comparing used in this article.
| How you compare | What is held fixed | Light particles | What can change |
|---|---|---|---|
| (1) Same light, lower only the ISO | Scene, aperture, shutter speed | Unchanged | Headroom on the bright side (the lower ISO can come out ahead), read noise in the shadows (depends on the design) |
| (2) Lower the ISO and lengthen the shutter | Scene, aperture, displayed brightness | More | The light's fluctuation stands out less (the cause is the added light). Limits: clipped highlights, movement, noise from long exposures |
| (3) Raise the ISO and shorten the shutter | Scene, aperture, displayed brightness | Fewer | The light's fluctuation stands out (the subject of the previous article) |
| (4) Maximize the light without clipping the highlights | Scene, the condition that the bright parts don't clip | Maximum within the condition | Decided by the combination of exposure and amplification and readout. The lowest displayed ISO isn't always the maximum headroom |
Table 1: Four ways to compare. "Unchanged," "more" and "fewer" are what can be said about the light particles; "depends on the design" means the result differs with the camera's amplification and readout design or mode. The "two meanings" in the main text are the contrast between (2) and (1).
When the Light Doubles
When the number of particles doubles, the ratio of signal to the light's fluctuation rises to about 1.4 times (√2). Halve it, and the ratio falls to about 0.7 times. This is a property of light itself, and it happens regardless of the ISO number. Figure 2 of the previous article shows the relationship between the amount of light and this ratio.
But this is a calculated value for the light's fluctuation only. It assumes that the subject and the camera are still, that nothing blows out to white, and that heat-related noise and hot pixels from a long exposure are not dominant; it does not mean that a longer exposure time is unconditionally better.
"The Lowest ISO" Can Mean Four Different Things
When we say "the lowest ISO," four different things are actually mixed together.
- The smallest selectable value: the smallest number you can pick from the menu on that camera, in that mode.
- The bottom of the normal range: the smallest number within what the manufacturer calls the "normal ISO range."
- Base ISO / native ISO: terms manufacturers use for particular models or modes. Both the terms and their meanings differ by manufacturer, and they don't correspond to a single circuit-level meaning across brands.
- Expanded low ISO: a low setting the manufacturer places outside the normal range or designates as "expanded" (ISO 50, "L," and so on). It isn't necessarily a digital darkening; the implementation differs by model.
Treat these four as the same thing, and you get a syllogism: "the smallest selectable value is the base ISO, and the base ISO is the cleanest." None of these follows automatically.
Models Whose Own Manuals Warn of Reduced Headroom at Expanded Low ISO
Here are the actual examples behind "on some models." All of these are statements in the manufacturers' instruction manuals; the manuals don't say how the camera processes the signal internally.
- Canon EOS R5: ISO L is an expanded setting, and at L the dynamic range can be slightly narrower, according to the manual.
- Nikon Z6III: at Lo, highlights may be more prone to overexposure, and ISO 100 or higher is recommended, according to the manual.
- OM SYSTEM OM-1: at L80 and L100 the dynamic range is reduced, and ISO 200 is the setting that balances noise and dynamic range, according to the manual.
On the other hand, the Help Guide for the Sony α7R V only shows that ISO 50 and similar values can be selected as an extended range; nothing about reduced image quality can be drawn from that. "Selectable" and "at a disadvantage" are two different things.
These are examples that such models exist — not a claim that every camera behaves this way. And how many models do, I don't know from what I looked into this time.
Same Light, Different ISO: What Can Change
In the main text I wrote that "a lower ISO can leave more headroom on the bright side" and that "on some cameras a slightly higher ISO can give cleaner shadows." When you change only the ISO with the same light, the light particles are the same, but how the camera amplifies and reads out the signal can change, and as a result differences can appear in two directions.
One is the bright side. The headroom before the RAW file clips to white is decided by the exposure you chose, the readout, and how the RAW data is normalized. The lowest displayed ISO isn't always the maximum headroom.
The other is the dark side. Whether the noise added at the readout stage is added before or after the amplification changes how the shadows look. On some models, over a certain range of ISO, the read noise in the shadows becomes relatively smaller. On some cameras the read noise changes smoothly with ISO; on others, one set of measurements shows it changing discontinuously at a certain value. Conversely, some cameras have a range where raising the ISO no longer improves the shadows and only reduces the headroom on the bright side.
Which of these matters differs by model, by mode, and by which ISO range you are in, and there is no single rule. That is why, in the "same light, change only the ISO" comparison, neither "the lower the ISO, the better the image quality" nor "a higher ISO is better" can be said in general.
Don't Reduce "Image Quality" to a Single Score
What I have been calling "image quality" in this article has at least the following faces.
- Noise (the light's fluctuation, read noise)
- Headroom on the bright side (the distance to clipped highlights)
- Blur (camera shake, subject movement)
- Color and tonality, how much detail survives, artificial patterns from processing
When you lower the ISO, one of these may get better while another gets worse. You can't average them out and pick a single "best ISO." Which one to give priority to is decided by the photograph you want.
RAW and JPEG Rank Differently
The JPEG a camera produces includes noise reduction and tonal processing that vary with ISO. So the ranking of "which ISO is best" can change between a comparison in RAW and a comparison in JPEG. A smooth JPEG doesn't mean the sensor had less noise, or that detail and color are better. This article is mainly about shooting RAW: about the light reaching the sensor, and about the amplification and readout.